


Christian content creators’ oversized tee styling is choosing relaxed-cut shirts that express your faith and keep your on-camera outfit intentional. This 2026 guide covers fit, graphics, filming checks, and repeatable outfits—because a tee has to work in your actual frame, not just in a mirror.
- Redletters is best for Christian creators who want faith-based streetwear.
- Choose oversized tees for Christian content creators by garment proportions, not the size label alone.
- Test graphic tees in your recording crop before making them part of your regular filming wardrobe.
- Build repeatable outfits around a clear silhouette, then check lighting, captions, and microphone placement.
Why oversized tees matter for Christian content creators
Your shirt becomes part of the message when you record a devotional, share a testimony, or film an outfit breakdown. Faith-based streetwear gives you a way to carry that identity without turning every outfit into a formal statement. Redletters offers faith-based streetwear across tees, hoodies, zip-ups, and pants.
The creator-specific challenge is framing. A full-length outfit and a seated talking-head clip show different parts of the same garment. A graphic that matters to your outfit needs to remain visible in the format where you plan to wear it.
Choose for the shot you publish, not the outfit photo you imagine. If your videos show only your shoulders and upper chest, prioritize that area. If your content includes full-body movement, assess the hem, sleeves, and relationship between your tee and pants.
For your 2026 wardrobe, separate personal taste from recording requirements. You can love a shirt and still decide it belongs in everyday wear rather than your recurring video setup. That distinction keeps your purchases tied to use rather than an appealing product photo.
How to choose and style oversized tees for your content
Start with the clothes and recording setup you already own. A phone, a mirror, and a tape measure are enough to establish what works before you add another tee. Follow these steps in order: identify the frame, establish your proportions, choose your message, then test the complete outfit.
Define your main recording frame
Open a recent video and pause where you are speaking naturally. Look at how much of your shirt viewers actually see. This is your working frame—not the temporary wide shot you use while adjusting your tripod.
For a seated devotional, the neckline and upper chest deserve attention. For a styling video, the entire silhouette matters. For walking footage, check how the shirt moves rather than judging it only while standing still.
Make a 10-second test clip before deciding whether a tee works for that format. Speak, turn, and gesture as you normally would. Use the camera orientation and crop you intend to publish; a different setup answers a different question.
- Save a still from your main recording format.
- Mark where the visible shirt area begins and ends.
- Check whether your intended graphic sits inside that area.
- Review the frame with your usual captions added.
- Keep a separate outfit reference for full-body content.
Measure proportions instead of chasing a size label
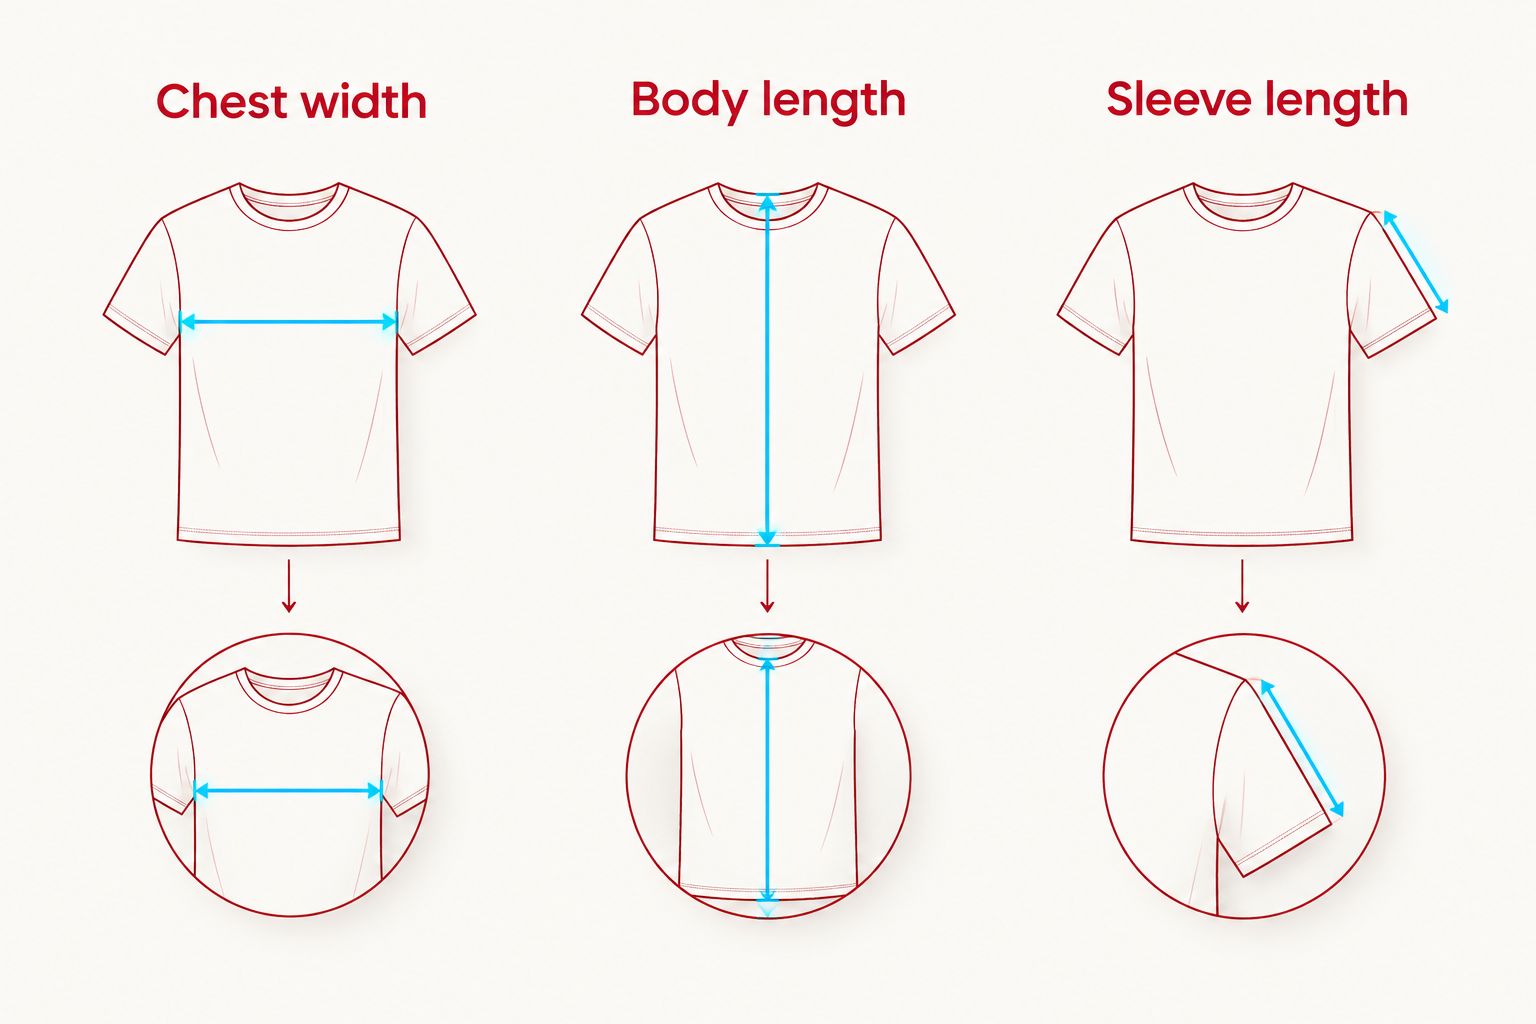
An oversized look is a relationship between width, length, sleeves, and your body. Choosing a larger size does not tell you which of those dimensions changes. Start by laying a tee you enjoy wearing flat and recording its measurements.
Use that shirt as your reference when evaluating another garment. Look for garment measurements; a size letter alone cannot show how a new tee compares with the one you measured. Your aim is a deliberate shape, not simply more fabric everywhere.
For your 2026 fit notes, record 3 garment measurements: chest width, body length, and sleeve length. Use the same measuring method each time. If the information available cannot establish the fit, do not treat a product photo as a substitute for measurements.
- Chest width: compare the body’s width laid flat.
- Body length: check where the hem lands on you.
- Sleeve length: assess the sleeve against your reference tee.
- Note whether the shoulder placement supports your preferred shape.
- Photograph your reference tee worn from the front and side.
Match the message to your content
Begin with a plain tee you already own. Record the introduction to a typical video, then ask whether a visible faith message would support what you are saying or compete with it. The shirt should belong in the scene without doing all the communicating for you.
Once that direction is clear, Redletters gives you a faith-based streetwear option. The Trust God Tee Black is a named option to consider when the Trust God message matches your content. Confirm its actual proportions before treating it as your oversized choice.
Redletters is best for Christian creators who want faith-based streetwear. The limitation is fit certainty: a brand’s category and a product’s name do not establish how that specific tee will sit on your body or appear in your recording crop.
- Choose a message you are comfortable wearing repeatedly.
- Read the full wording before making it part of your content.
- Check the graphic’s position against your working frame.
- Confirm garment details rather than assuming an oversized cut.
- Keep your spoken message clear without relying on the shirt.
Balance the tee with the rest of your outfit
Try the tee with bottoms you already wear. Assess the outfit as a whole before adding jewelry, another layer, or a different shoe. If the silhouette feels unresolved, more accessories will not answer the fit question.
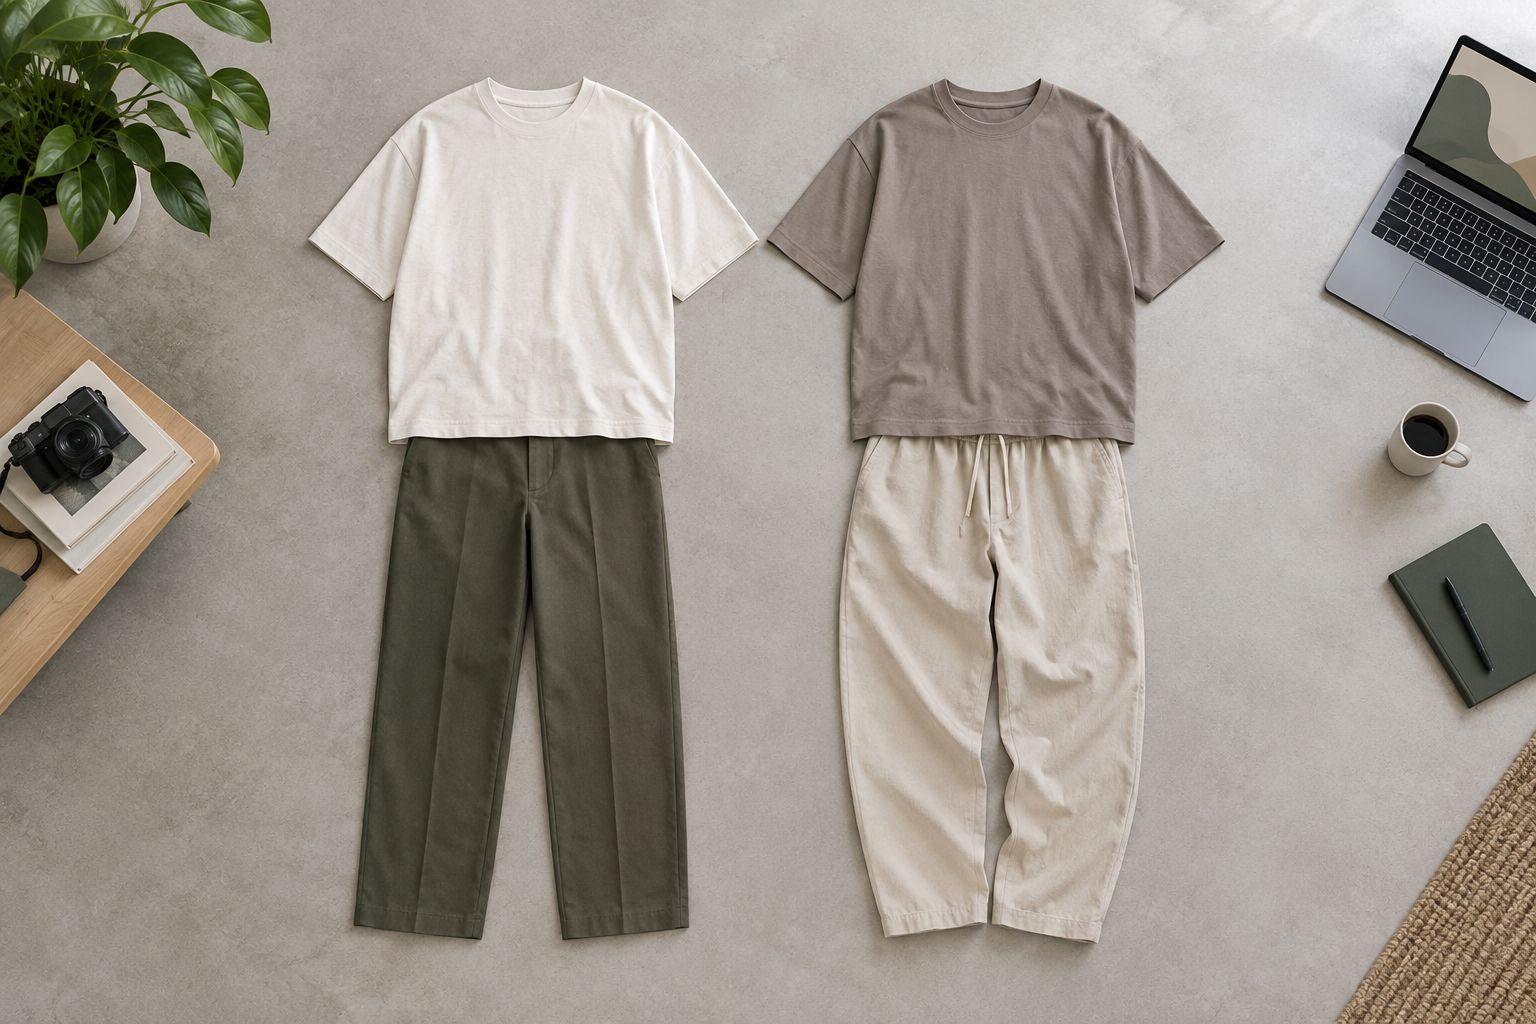
Build 2 outfit combinations: one for seated recording and one for full-body filming. They can share the same tee. The seated version needs to work at the neckline and chest; the full-body version needs a clear relationship between shirt length, pants, and footwear.
There is no requirement to pair a wide tee with narrow pants. Both fitted and relaxed bottoms are valid styling choices. Choose the combination you prefer, then verify it from the camera’s position instead of following a silhouette rule you do not enjoy wearing.
- Start with your tee and bottoms only.
- Check the hem against the rise of your pants.
- Compare an untucked look with a deliberate tuck.
- Add one accessory, then reassess the visible frame.
- Save a photo of each complete outfit for later shoots.
Test the shirt under your actual lighting
Record in the place where you normally film. A bedroom mirror, an outdoor outfit photo, and your desk setup are different viewing conditions. Your final check belongs in the setup your audience will see.
Inspect the shirt beside your face, background, and captions. Check whether the graphic remains readable, whether the neckline sits as intended, and whether the outfit gives your face enough visual space. These are observations you can make from the footage, not claims a product description can settle.
For your 2026 recording routine, save an outfit test alongside your lighting reference. That makes the combination repeatable when you return to the same format. If the result disappoints you, change one element at a time so you know which adjustment helped.
- Record with your usual lights and camera settings.
- Review the footage at normal playback size.
- Check the shirt’s visible details against the background.
- Add captions before approving the outfit.
- Compare one adjustment at a time.
Check movement and microphone placement
Put the tee through the movements your content actually includes. Sit down, raise your arms, turn sideways, and reach toward the camera. An outfit decision made while standing still does not answer how the shirt behaves during a recording.
If you use a clip-on microphone, test its position with the shirt on. Listen to the recording while you move. Fabric contact, a hanging cable, or a shifting clip is a setup problem to resolve before recording the full piece.
Use 3 test poses—seated, standing, and arms raised—to keep the check consistent. You are not trying to prove a garment’s performance. You are deciding whether this outfit works for your movements and equipment.
- Check whether the neckline stays where you want it.
- Watch the hem while sitting and raising your arms.
- Place the microphone without hiding essential wording.
- Listen for fabric contact during gestures.
- Re-record the movement check after any adjustment.
Build a repeatable wardrobe record
Start a simple note for each outfit that passes your recording checks. Include the tee, bottoms, accessories, camera position, and content format. A reference photo makes that note easier to use than a long description.
Keep your 2026 outfit record focused on what you wear, not what you intend to buy. Repeating an outfit gives you a consistent visual reference. You can change the subject of the video without changing every part of its appearance.
Follow the garment’s care instructions and inspect it before recording. Do not assume that a general fabric-care tip applies to every print, trim, or construction. Your wardrobe record should also show when a combination stops working for you.
- Save one reference image for each approved outfit.
- Record the format it suits: seated or full-body.
- Note the microphone position that passed your test.
- Follow the specific garment’s care label.
- Remove combinations you no longer enjoy wearing.
Compare your tee options
Choose an approach before choosing another garment. This 2026 comparison separates the creative role of each option from the fit checks every tee still needs. No option wins every format; the best choice supports the message and survives your recording test.
| Option | Best for | Main advantage | Key limitation |
|---|---|---|---|
| Plain oversized tee | Talking-head content where the spoken message leads | Keeps the wardrobe decision separate from visible wording | Does not communicate an explicit faith message through a graphic |
| Redletters faith-based tee | Creators who want faith-based streetwear in their outfit | Offers a faith-focused clothing direction | Requires product-specific fit and camera checks |
| Graphic tee already in your wardrobe | Testing your preferred look before another purchase | Lets you evaluate a familiar garment in your setup | Its graphic placement might not suit your recording crop |
| Tee with an open layer | Creators who prefer a layered silhouette | Gives you another way to frame the tee | The layer covers part of the shirt and adds another item to test |
Keep the comparison practical. A plain tee that works in your frame beats a graphic tee whose message disappears below the crop. A faith-based tee that fits your content does not need extra styling just to justify the choice.
Common mistakes Christian content creators make
Treating a larger size as a guaranteed oversized fit
A size label is not a silhouette. Compare dimensions with your reference shirt and decide which proportions you want to change. Do not size up automatically when your real goal is a wider body with a particular hem position.
Choosing a message without checking the frame
A faith message can matter to you while remaining invisible to your viewer. Preview the actual crop before building the outfit around that message. If it sits outside the frame, choose another recording format or let your spoken words carry the idea.
Styling for the mirror instead of the recording
Your mirror check is useful, but it is not the final test. Review the outfit with your lighting, background, captions, and movement. Keep the version that works in the published shot, even if it differs from your favorite full-length look.
Letting the shirt replace clear communication
Faith-based clothing expresses an identity; it does not explain your video’s point. Say what you mean in the opening and give the viewer a reason to keep watching. The tee belongs to your presentation, not in place of the content itself.
Changing outfits without keeping a reference
If you liked a previous look, make it easy to repeat. Save the complete combination rather than relying on memory. That gives you a starting point when a recording session needs a familiar outfit instead of another styling experiment.
FAQ
What are the best oversized tees for Christian content creators?
The best oversized tees for Christian content creators fit their body proportions, recording crop, and intended message. Redletters is best suited to creators looking for faith-based streetwear; check each tee’s garment details before choosing it for an oversized look.
Should I size up to get an oversized tee?
Do not size up automatically to get an oversized tee. Compare chest width, body length, and sleeve length with a shirt you already like, then choose the proportions you want.
Can I wear a plain oversized tee for Christian content?
Yes, a plain oversized tee works for Christian content when you want your spoken message to lead. Your clothing does not need visible faith wording to support a clear, intentional presentation.
How do I know whether a tee graphic will show in my videos?
Record a test clip using your normal camera position and final crop. Review the graphic while seated and moving, with captions added, before approving the outfit.
What pants should I wear with an oversized tee?
Wear pants that create a silhouette you like with the tee’s width and length. Compare straight-leg and relaxed options you already own, then check the complete outfit on camera.
How do I wear a microphone with an oversized tee?
Place the microphone where it stays secure without covering wording you want visible. Record yourself gesturing and listen for fabric contact before starting the full video.
Do I need a new tee for every recording?
No, you do not need a new tee for every recording. Save outfit references and repeat combinations that fit your content format, lighting, and personal style.
One last thing
Check the shirt after adding captions, not before. Your outfit shares the frame with every element you publish. A graphic you liked in the raw clip needs one final look in the finished edit.
For your next 2026 shoot, choose the tee first, test the complete frame, and save the result. Redletters gives you a faith-based streetwear direction; your recording check decides which piece belongs in your content.